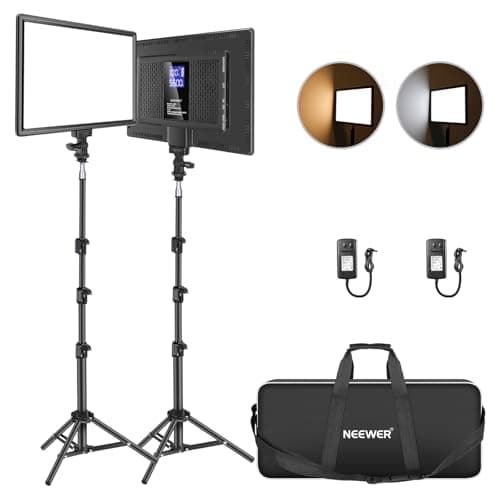
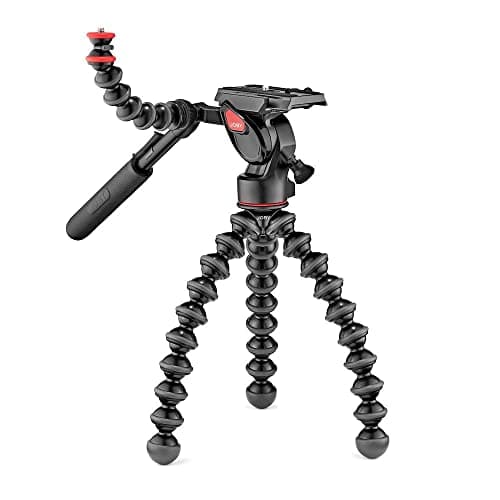
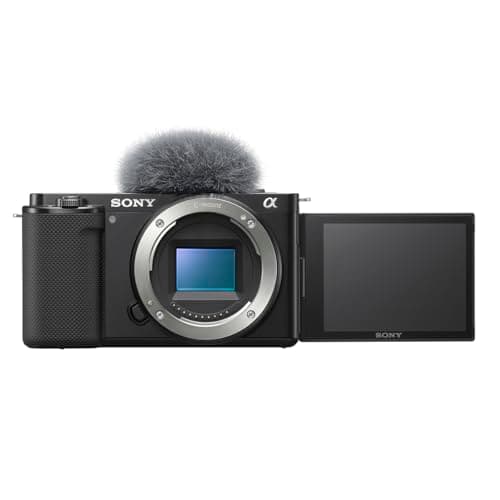
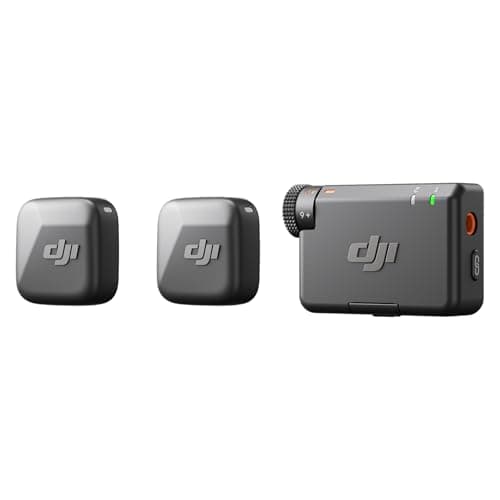
To start a YouTube channel you need four things, and the order matters more than the brands: a microphone first, a light second, something to hold the camera steady third, and a camera last, because the phone you already own is good enough to begin with. YouTube's own Help Center says you can always start with your phone's camera, and that "good sound is a must." Our picks for each step are the DJI Mic Mini wireless kit, a two-panel Neewer light kit, the Joby GorillaPod 3K, and the Sony ZV-E10 for the day the phone starts holding you back.
The usual disclosure: we haven't tested this gear ourselves. The order and the picks come from YouTube's own guidance, manufacturer specifications and FAQs, and the published findings of reviewers such as SoundGuys and DPReview, all linked in Sources.
The minimum kit, in the order to buy it
| Step | What | Why it comes here | Our pick | Skip it for now if |
|---|
| 1 | Microphone | Viewers forgive imperfect light much sooner than poor sound | DJI Mic Mini (2 TX + 1 RX) | Never: this is the one to buy first |
| 2 | Light | Even, consistent light on your face lifts any camera, including a phone | Neewer 13in two-panel kit | You can film facing a large window at the same time of day, every time |
| 3 | Support | A steady frame at eye level that looks the same every session | Joby GorillaPod 3K | You already own a tripod, or have a shelf at the right height |
| 4 | Camera | The last upgrade, once the phone is genuinely the weak link | Sony ZV-E10 | Your phone footage already looks right in your light |
When we checked prices, the first three pieces together cost less than the camera alone. That is the whole argument for this order: those three improve every video you make on the phone you already have, and all of them carry straight over when a camera arrives.
Why audio comes first and the camera comes last
YouTube's equipment tips are blunt about priorities: "Viewers often don't mind imperfect lighting, but they are less accepting of poor sound quality." The same page says you can always start with your mobile device's camera, calling it "a great option before you invest in a standalone camera." Descript's guide to setting up a YouTube studio lands in the same place: "Put audio and lighting first, since clean sound and a well-lit frame lift quality more than an expensive camera does."
The reason is physical, not fashionable. A microphone built into a phone or camera sits wherever the camera sits, often an arm's length or more from your mouth, so it records the room as much as your voice. A clip-on mic a few inches from your mouth records you. Light works the same way: a camera can only work with the light it is given, and a dim room pushes any sensor, phone or mirrorless, into grainy, muddy footage. Fix the sound and the light and the phone you own starts looking and sounding like a far more expensive setup. Buy the camera first and you get sharper footage of the same echoey room.
The support comes third because it is what makes the first two repeatable. A mount that doesn't move means the same framing, the same distance to your light and the same background every time you sit down, which is what makes a channel look consistent from one upload to the next. If you have nowhere stable to put a phone at eye level, swap steps two and three; what matters is that both come before a camera.
What to look for in each piece
1. The microphone: close to your mouth, and works with both phone and camera
A starter mic has two jobs. It has to get close to your mouth wherever the camera is, and it has to work with the phone you start on and the camera you might buy later, so you only buy it once. That points to a small wireless kit: a transmitter clipped to your shirt and a receiver on the phone or camera. Our best microphones for vlogging ranking explains the wireless-versus-shotgun choice in detail.
We weighed two candidates for this slot, the DJI Mic Mini and the Rode VideoMic GO II, and chose the DJI on the evidence. DJI's FAQ says the Mic Mini works with cameras, with smartphones through a USB-C or Lightning adapter or a direct Bluetooth connection, and with computers, and that its transmitter connects straight to DJI cameras such as the Osmo Pocket 3 with no receiver. The Rode is a very good on-camera shotgun that needs no battery, but Rode's own page says the extra cables needed to connect it to phones and computers over USB are sold separately, and an on-camera mic is only ever as close to you as the camera is. The kit we link has two transmitters, so a guest can be miked too, and when we checked it was also the cheaper of the two.
The honest catches, from SoundGuys' review: the Mic Mini transmitters have no onboard backup recording, so "the take you get is the take you'll have to use," and SoundGuys noted signal interruptions while moving during its testing. They also need charging; SoundGuys lists 11.5 hours per transmitter and 10.5 hours for the receiver. Its verdict was an "excellent all-in-one microphone system for casual content creators on a budget," which is exactly who this page is for. If you will only ever film on a camera at arm's length and never want to charge anything, the Rode VideoMic GO II is the better fit, and it is also the fallback if the DJI is out of stock when you shop.
2. The light: soft, adjustable and complete in one box
Your first light should be soft enough to flatter a face without a modifier, adjustable in color so it can match daylight from a window or the warm bulbs in your room, accurate enough in color that skin looks like skin, and complete, meaning it arrives with something to stand on. It should also give you two sources, one for each side of your face, because a single light leaves the other side in shadow. And remember the free option: YouTube's tips point out that the sun is one of the brightest and cheapest lights there is, so a big window you can face is a perfectly good first light.
That checklist is why we picked the Neewer kit over the Godox SL60IID, even though the Godox tops our best lighting for video ranking. Neewer's package lists two NL-192AI panels, two light stands that extend to 70 inches, two power adapters and a carrying bag, with color adjustable from 3200K to 5600K and a CRI of 97+. The panels also run on built-in batteries, which Neewer rates at about 1.5 hours. The Godox is a single, far more powerful 70W light: Godox lists 18,600 lux at one meter with its standard reflector, against 660 lux at one meter for each Neewer panel, roughly 28 times the output. But it runs on mains power and, as our lighting ranking notes, it needs a stand and, ideally, a softbox before it looks its best. The two cost about the same when we checked; only one of them is a complete two-light setup out of the box.
3. The support: steady, at eye level, and ready for a camera later
Look for a mount that holds a phone now and a mirrorless camera later with load capacity to spare, and that can put the lens at your eye level wherever you film. The GorillaPod 3K covers that for a desk-based channel. Joby's specification sheet rates it for 6.61 lb (3 kg), lists the kit at 0.87 lb, and gives it a standard 1/4"-20 tripod mount. Its flexible legs grip a shelf edge, a chair back or a railing when there is no flat surface at the right height. Two catches: it is a tabletop-height tripod, so it relies on a desk or shelf to reach eye level, and Joby's compatibility list names cameras, lights and mics, not phones, so budget for a phone clamp with a 1/4"-20 thread until the camera arrives. If you film standing, you need a full-height tripod instead; our best tripods ranking covers those.
4. The camera: buy it when the phone is the bottleneck
You are ready for a camera when your phone is visibly the weak link: footage goes grainy in your room even with the light on, you want a background that falls softly out of focus, you need to plug in and monitor a microphone, or filming is eating your phone's battery and storage. When that day comes, look for a screen that flips to face you, autofocus that tracks your face and eyes, a microphone input and ideally a headphone jack, and clean 4K.
The Sony ZV-E10 ticks every box. DPReview's review lists what it offers as a vlogging platform: good quality oversampled and uncropped 4K/24p, a selfie touchscreen, headphone and microphone ports, and class-leading video autofocus. DPReview also found it livestream-ready out of the box. Its catches, also per DPReview, are a 1.23x crop at 4K/30p and noticeable rolling-shutter wobble in 4K, which show on fast pans rather than a seated talking head. For the full field, see our best cameras for YouTube and best vlogging cameras for beginners rankings.
Here is the kit that clears that bar, in the order we would buy it. Each card below lists the specs and the honest catch; how to set the four pieces up together follows after.
Setting it up on day one
Good gear set up badly still looks and sounds amateur. These three habits matter more than anything on the spec sheets above, and our guide to filming yourself goes deeper on each.
Mic placement
Clip the transmitter to the center of your chest, pointing up toward your mouth, and keep it clear of zips, necklaces and jacket collars that rub against it. Outdoors, fit the furry windscreen. The Mic Mini has two levels of background-sound reduction; SoundGuys found it takes the edge off steady low rumble without removing environmental sound entirely, so it is no substitute for a quiet room. It also has automatic limiting, which guards against a sudden laugh distorting. Because the Mic Mini keeps no backup copy, keep the receiver in line of sight and record a 20-second test before every session, played back on headphones rather than a laptop speaker.
Key-light position
Wistia's production team sums up the placement: "position the light sources in front of the camera lens and just above the subject's eyeline." With the Neewer kit, set one panel slightly to one side as your key light and the second on the other side at lower brightness as a fill, so one side of your face is a little brighter than the other. Match both panels to the room: toward 5600K when daylight from a window is in the shot, toward 3200K at night under warm bulbs. Keep them close. Neewer's own figures show each panel drops from 2,400 lux at half a meter to 660 lux at one meter, so a panel across the room does very little. And never sit with a bright window behind you; the camera exposes for the window and turns you into a silhouette.
Framing
Put the lens at eye level, not below your chin, with your eyes roughly a third of the way down the frame and a small gap above your head. Sit a few feet in front of the wall rather than against it, so the background reads as a room rather than a backdrop. Look at the lens, not at yourself on the screen. When the ZV-E10 arrives, our best camera settings for video guide covers frame rate, shutter speed and the settings that keep a talking head sharp.
The upgrade path
Once the four pieces are working, upgrade in the same spirit, fixing the weakest link first rather than buying the newest thing:
- A brighter key light. When the panels feel underpowered, a COB light with a softbox, like the Godox SL60IID in our lighting ranking, is the step up; keep one Neewer panel as the fill.
- A full-height tripod. The GorillaPod stays in the bag for location shots, and a tripod frees you from needing a desk at the right height.
- A second lens for the ZV-E10. DPReview found the kit lens gives a 24mm-equivalent view at its widest, which suits vlogging; a fast prime is the lens that adds real background blur for sit-down videos.
- A vertical workflow for Shorts. If short-form grows into a big part of your channel, our best cameras for TikTok guide covers the cameras that handle vertical video best, and the Mic Mini transmitters pair directly with one of them, the Osmo Pocket 3.
What not to buy yet
- A gimbal. For a seated channel the camera never moves, and a tripod does the job for less. Buy one only when walking shots become a regular part of your videos.
- A pricier camera body. An expensive camera filmed in a dim room through its built-in mic loses to a phone with a clip-on mic and a light, which is the whole point of this order.
- A capture card. If you plan to stream, DPReview found the ZV-E10 livestream-ready out of the box, so start there and add hardware only if you hit a real limit.
- Colored accent lights and backdrops.They are fun, but they decorate a setup; they don't fix one. Get the key light, the fill and the sound right first.
- A second microphone kit. The Mic Mini kit we link already has two transmitters, so an interview or a co-host is covered.